Wednesday, 28 February 2018

Roasted Carrot & Quinoa Bake

I adore roasted carrots and I'm fond of fluffy quinoa so I was always going to love this delicious dish. A flavourful and nutritious bake, all roasted in the one tin, makes a perfectly simple meal just as it is or a lovely side dish. Leftovers most definitely make for a healthy lunch salad the next day too! 

Simple & delicious!

There are roasted parsnips along with carrots in Rukmini Iyer's original recipe from her cookbook, "The Roasting Tin:  Simple One Dish Dinners". While I don't mind parsnips, I didn't have any so I just roasted plenty of delicious carrots instead! Here's how it came together in my kitchen:

Carrot & Quinoa Bake

4 - 5 large carrots
2 cloves garlic
fresh rosemary, 2 sprigs 
2 bay leaves
1 Tablespoon olive oil
1 Tablespoon honey
salt & pepper
120g quinoa, thoroughly rinsed 
350ML boiling water
lemon

1.   Preheat oven to 180C.

2.   Peel carrots and halve lengthwise then cut into long chunks.

3.   Put carrots in a roasting dish with crushed garlic, chopped rosemary, bay, olive oil & 
       honey. 

4.   Toss together with your hands so carrots coated in herbed & honeyed oil. Season with
       salt & pepper.

5.   Bake, uncovered, for approximately 40minutes. 

6.   Remove from oven. Carefully mix in rinsed quinoa and boiling water making sure you 
      loosen all the caramelised goodness from the bottom of your roasting tin.

7.   Cover with foil and return to the oven to roast for further 20minutes.

8.   Remove from the oven and lift off the foil. Fluff up the quinoa with a fork and then leave
      for a further five minutes. 

9.   Serve with a wedge of lemon so it's lovely juice can be squeezed over the top. 

This beautifully simple bake can be served with peppery rocket, as it is in the cookbook, or you could mix in some baby peas, bright green and sweet, instead.  Either way, it's delicious!

Meg


Monday, 26 February 2018

Weekend Days in the Garden

We've had a couple of welcome wet days here.  Friday saw some very heavy falls. Low, dense clouds blanketing the sky and rain drumming loudly on the roof and gushing from gutters. An inside day for everyone! Sir Steve dog's walk was cancelled due to lashings of precipitation ... but try explaining that to an enthusiastic Labrador who feels hard done by!

The rain continued to fall in heavy showers throughout Saturday. Breaks in the weather, peeks of sunshine now and then, humid and warm. Beautiful boy's cricket match was cancelled, much easier to explain than a Labrador's missed walk! The garden beckoned, that sense of impatience and optimism that I find comes along with soaking rain.  So, on with my old, torn and soil-stained gardening clothes and gumboots (that I keep for just such occasions) and outside into the rain ...

Drenched!

The main veggie patch was cleared of its tangled cucumber vines and frazzled celery amongst other things.  Ready for rejuvenation!

Cleared veggie patch.

Cranberry Hibiscus and yellow Clivia Lillies were planted in the garden that surrounds the spot where our son's sandpit used to be. There are established shrubs there; a Little Gem Magnolia right in the top corner and two Michelia Cocos either side. I'm trying to grow this garden cheaply by using plants that I propagate from cuttings or through division. I hope to add salvias around the birdbath at some stage too. The pumpkin vine keeps wanting to spread out into the lawn so something more compliant is needed in that spot.


 The sandpit garden.

One of three tiny Cranberry Hibiscus that I grew from cuttings.

Division of one yellow Clivia Lily now makes for three!

Sunday dawned a little brighter and so, after a walk with the beside-himself-with-joy Sir Steve, I returned to the veggie patch I'd cleared. I lifted the soil gently with a garden fork, loosening it without turning it over. A sprinkling of little leguminous leopard tree leaves that I collected on our walk and some torn pumpkin leaves from that pesky vine up the back. As they break down, they will nourish to the soil.

Little leopard tree leaves & torn pumpkin leaves to nourish the soil.

  A layer of manure and compost over the top.

Watered in with worm tea & protected with a blanket of pea straw.

In a few weeks time I will plant in our rejuvenated veggie patch. I'm already dreaming of lettuce, spring onion, silverbeet and kale. Definitely beetroot too! Perhaps we'll have a few more wet days before then. 

What did you get up to during your weekend days?

Meg


Friday, 23 February 2018

Summer's Stormy Skies

Several scorching hot days here this Summer have finished with late afternoon storms rolling in over the ridge. We have watched the beautiful sky; the change from that high, clear blue of the earlier day to the ominous dark grey of swelling clouds as they gather. 

A brewing storm. 

Rain-laden storm clouds above the trees. 

A stormy sky above our place.

Rain falling off in the distance.

 The colours of a storm cloud.

These stormy skies have inevitably crackled with lightning as thunderous rain has fallen; at times so heavy we've heard its drumming before it's reached our place. Welcome storms that have cooled some late Summer afternoons and left behind a clearer air scented with rain.

How's the weather at your place?

Meg


Monday, 19 February 2018

Escaping the Heat in the Hinterland

During a week of soaring temperatures, we headed an hour or so north, up to the Hinterland of our Sunshine Coast. While it was very hot everywhere, and those further west certainly felt the worst of it, we found the cooling shade of the trees and refreshing water of local creeks a welcome relief from the heat. 

 A green and shady "umbrella" of trees.

The cool, gurgling water of the Obi Obi Creek, Maleny.

Fresh, clear water.

 Gardeners Falls and rock pool.

Old trees casting shade in the paddocks.

A hazy view over the Glasshouse Mountains.

A dizzying drop from the  Mapleton Falls Lookout.

A trickle of water runs over Mapleton Falls.

The lush, green Obi Obi valley.

Walking and picnicking under an umbrella of green, the cooling and calming colour of nature, was a lovely way to escape the heat for a while.

Meg


Saturday, 17 February 2018

Apricot Jam Drops

Jam drops, those little biscuits with a fingerprint-sized puddle of jam in the middle, have been among my favourite biscuits since I was small. Batches of them, round and filled with jewel-coloured jams, would be baked in the old stove ready for morning and afternoon teas. They were always hard to resist; I could never wait for the jam to be cool enough before sampling one and so regularly burnt my mouth on them. Dangerous biscuits! 

My favourite jam drops are those filled with golden, tangy apricot jam. Oh, how I love apricot jam! Of course, you can fill the fingerprints you press into the little balls of biscuity dough with any or all of your favourite jams ~ strawberry, raspberry, plum, blackberry or any other jam you fancy. For me though, apricot will always be the best!

Homemade apricot and strawberry jam drops.

Kathy, over at Our Simple and Meaningful Life, recently made these delicious jam drops and I felt a batch at our place was sorely needed for I haven't made them in awhile. In the recipe my mother made, and that I learned to cook, the butter and sugar are creamed together. The recipe I make now, and which I adapted from one by Deborah Wray (founder of Wray Organics) begins with a different process. Here is how I make our jam drops now:

Apricot Jam Drops

80g coconut oil (heated very gently if not already in liquid state)
50g coconut sugar (or brown sugar)
2 eggs
1 1/2 cups white spelt flour
1 1/2 teaspoons baking powder
apricot jam (or any favourite jam)

1.   Preheat oven to 160C.

2.   Line two biscuit trays.

3.  Beat coconut oil, coconut sugar and eggs until mixture is thick and creamy.
     (Make sure your coconut oil is not too hot so that you don't cook the eggs in it!)

4.  Sift spelt flour and baking powder.

5.  Add sifted flour to coconut oil mixture and mix well to form a soft dough.

6.  Roll tablespoons of dough into balls, placing them on biscuit trays.

7.  Press your fingerprint into the top of each little ball of biscuit dough to make a place for
      puddles of jam.

8.  Fill each fingerprint with apricot jam.

9.   Bake for 15mins or so until biscuits are lightly golden.

10. Leave to cool slightly on baking trays before using an egg flip to transfer to wire rack to 
       finish cooling.  Store in airtight container in the fridge (particularly if you live in a warm
       climate).

Creamy coconut oil, coconut sugar and eggs.

Adding flour to form a soft biscuit dough. 

Fingerprints waiting to be filled!

Little puddles of apricot jam. Mmm ...

Delicious!

Remember to wait for the biscuits to cool before sampling any of these little jammy treats...otherwise you may end up burning your mouth on one too!

Meg


Wednesday, 14 February 2018

Sunprint Garden

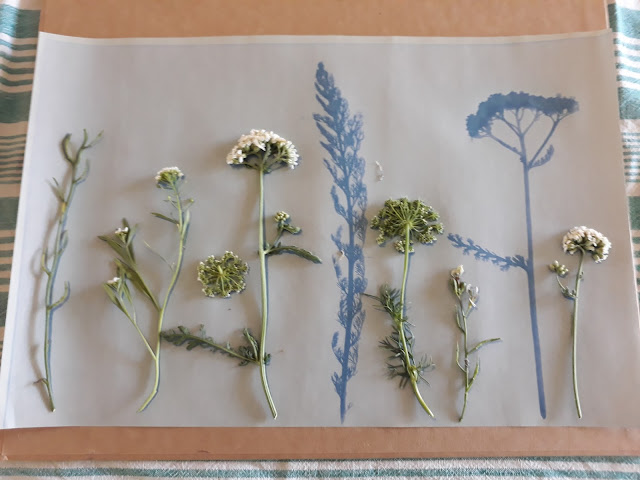
Clustered flowerheads, delicate umbels, whisper-thin stems and feathery leaves casting shadows and leaving beautiful prints.  


Snippets of my garden in a sunprint.

 A magical process that results in stunning prints.

These stunning white on cyan-blue sunprints are technically known as cyanotypes. The process is actually a photographical one, capturing an image without a camera, that was developed by Sir John Herschel. It was a woman, botanist and pioneering photographer, named Anna Atkins, who began using the process, in the mid 19th Century, to record finely detailed botanical images of sea algaes and ferns. I would dearly love to spend time looking at every single page of her exquisite book, but this YouTube clip is the closest I could find to holding it in my own hands. Hers was the first book ever published exclusively with photographic images. How amazing!

The process of making these stunning prints is simple and oh so satisfying!

Gather sprigs of plant material from your garden.

Gather printmaking supplies ...
 cyanotpye paper, thick piece of cardboard, perspex, water bath.


Lay cyanotype paper onto thick cardboard.
Sandwich plant material between the paper with clear perspex on top.

Lay out in sun for up to 5 minutes.

Carefully remove plant material to reveal beautiful prints.

Rinse the paper in a tub of water and watch as the prints fade to white.

Dry on a flat surface. 
As the sunprint dries, the background will become a deeper and deeper cyan blue.

Here are two of the other sunprints I made:

 Almost-finished rocket flowers.


Scattered dry umbels of Queen Anne's Lace.

There are many beautiful projects that can be made with these stunning sunprints. From simply framing your favourite print to using the gorgeous paper to make bookmarks, handmade cards, gift boxes or as wrapping paper. I would love to explore how to make these prints on fabric. How lovely would that be!

Sunprints are a simple and satisfying way to capture the botanical beauty of plants. I made my prints in the sunshine of a scorching hot Summer's day. Perfect for that kind of weather. I think the process could also be quite addictive too!!

Meg 


Monday, 12 February 2018

Here & Now 18

The Summer seems to be stretching on, another wave of very hot days is here. Now, the heat keeps me from the garden but for the early morning hours when I wander, hose in hand, under the blue-ing sky. I am especially besotted with the yarrow that is blooming in the garden;  its tiny flowers daisy-like with their little white petals and yellow centres. An ancient plant, said to stand for health and inspiration, I'd love to capture its simple beauty somehow before its flowers fade.


Tightly closed buds in a yarrow flowerhead.

Little buds just beginning to open.

Tiny & sweet yarrow flowers.

Loving //   The tiny, daisy-like flowers of ancient yarrow.

Eating //   Jam drops with sticky, golden centres of apricot jam.

Drinking //  ... in the quietness of home on Summer's weekend mornings.


Feeling //  A little Summer weary.


Making //  Sailor tops and chocolate cakes (a perfect combination!)


Thinking // ... of stitching a cluster of tiny yarrow flowers on the wide hem of my sailor top.


Dreaming //  ... of the gorgeous handmade projects in this lovely magazine.


Lazing in the garden in late afternoon shade.


To look at all the creativity and loveliness that is in other people's photographs, gardens, crafts, baking and projects, you can visit Sarah, of Say Little Hen, who hosts the Here & Now link up. Join in too if you want to, then we can see what is happening in your own here and now.

Meg


Friday, 9 February 2018

A Different Kind of Chocolate Cake

From a tin of red kidney beans, found floundering in the pantry and not quite out-of-date, came this scrumptious chocolate cake. Gluten free, moist, dark and chocolaty! The red kidney beans replace the flour one would normally incorporate into a cake batter. After it's been baked though, you'd never know!


Different but soooo good!

The recipe for this different kind of chocolate cake was developed by Sarah Wong over at Clever Cook.  I'm not sure what inspired her to make chocolate cake with red kidney beans ... perhaps she had a tin of these beans that needed using up too! She calls her creation the Magic Bean Cake. I think that's an apt description of the alchemy that happens while this cake bakes.  There's no trace of those kidney beans (and believe me, my son would soon uncover them if they were there).  

While her recipe is written for the Thermomix, it would be very easy to make this cake with a food processor. The red kidney beans just need to be whizzed up well with water, egg and vanilla until smooth. The butter and sugar can be creamed with a simple hand mixer or by hand. And a bowl and wooden spoon would work just as well for mixing in the dry ingredients.  Add a luscious icing, like this easy and velvety Chocolate Fudge Icing, and you have a cake worthy of doing birthday cake honours!

Adding the finishing touches!
(With candles it was even more special!)


I hope there's a piece of cake waiting for you somewhere in your weekend. I'd share a slice of this one with you but the only evidence left by birthday boy and his friends were their smiles ... and a few crumbs!

Meg