Showing posts with label afternoon tea. Show all posts

Sunday, 20 September 2020

Cinnamon Scrolls or Perhaps Scones

I woke up early and just felt like cinnamon scrolls.  Maybe it was because it was a weekend or maybe it was the beginning of the school holidays that swayed me away from our usual porridge or omelettes and toast. Most likely though, it was the thought of a warm scroll filled with tart apple, crunchy walnuts and the distinctive scent of cinnamon. I didn't want to fuss around with yeast and waiting though so cinnamon scrolls became cinnamon scones. Just as swirly and delicious!

Freshly baked cinnamon scones.

I gathered the ingredients, with a nod to this Thermomix recipe, decided I'd add chopped apple and walnuts too and more cinnamon, and set about making them while the day warmed up.

The makings of cinnamon scones.

While I made these cinnamon scrolls scones this time, I think I much prefer The Organised Housewife's version, for The Most Delicious Cinnamon Scrolls which doesn't require yeast either (or a Thermomix) and which uses thickened cream instead of milk in the dough. 

A sweet, crunchy and cinnamon-y filling.

While cinnamon scrolls often have an icing drizzled over their tops, I felt more like an apple and walnut filling to go with my cinnamon-y swirls instead. Apples and cinnamon always go together, don't they?!

Rolled & sliced and ready for the oven.

As they baked, the warm scent of cinnamon wafting through the kitchen, I waited impatiently and thought it may well have been quicker and easier to pop down to the little local bakery and buy a cinnamon scone scroll, one made with yeast and with icing on top, but then my kitchen wouldn't smell as nice and there probably wouldn't be apples and walnuts in such a scroll and I wouldn't have looked forward to it half as much!

Meg


Saturday, 16 May 2020

Home-baked Chocolate Chip Bars

There's always a home baked offering for morning or afternoon tea at our place. It might be  our favourite biscuits, fruity muffins, a simple slice, fresh scones or, on the odd occasion, a cake. This past week, we enjoyed home-baked chocolate chip bars which are a homemade alternative to store-bought, plastic-wrapped, super-sweet chocolate chip muesli bars.

Yum!

These homemade chocolate chip bars are very easy and quick to make. With a few minor adjustments to this original recipe, for Oatmeal Chocolate Chip Bars, from Lydia at the Thrifty Frugal Mum site, this is how I made them:

Home-baked Chocolate Chip Bars 

Dry Ingredients:
3/4 cup plain flour
1/4 cup wholemeal spelt flour (or plain wholemeal flour)
1 cup quick cooking oats
1/3 cup brown sugar (loosely packed)
1/2 teaspoon baking powder
1/2 teaspoon bicarb soda
1/2 cup dark chocolate chips

Wet Ingredients:
1/2 cup oil (I used macadamia nut oil but canola or a light vegetable oil would also work.)
2 eggs
1 teaspoon vanilla

1.  Preheat oven to 180C and line a 20cm cake tin or medium size slice tray.

1.  Combine all dry ingredients in a mixing bowl.

2.  Whisk together wet ingredients in separate bowl or jug.

3.  Make well in centre of dry ingredients and pour in wet ingredients.

4.  Mix until combined. 

5.  Press mixture into your lined tin or tray.

6.  Bake for 15mins or until lightly golden.

7.  Cool on wire rack before cutting into bars. 

One of these chocolate chip bars is just right for morning or afternoon tea at home but also perfect for putting into a lunchbox too. With a list of easily-recognisable ingredients, that does not include things like humectant, modified starch, invert sugar and some unknown flavour, they are a more wholesome alternative to that store-bought something that comes in a packet.

Well worth baking!

Meg


Saturday, 9 May 2020

The Simplest Chocolate Cake

Who knew chocolate cake was possible without eggs or milk or butter? I didn't until I went searching and found quite a few recipes for making chocolate cake without these staples.  Not only can you make a chocolate cake but you can make one that is sweet, soft and moist and perfect for topping with chocolatey icing and sprinkles.

Instead of eggs, milk and butter, there are recipes for chocolate cakes that use oil, vinegar, baking soda and water. All the versions I found were slight variations on a recipe like this one for Chocolate Depression Cake

💓 Chocolate cake with sprinkles.💓

The recipe I followed, for a One Bowl Chocolate Cake from Ashika over at the Gardening Foodie blog, is so simple and quick to make. Everything gets whisked together in just one bowl so less washing up too. I tweaked Ashika's recipe slightly, by replacing white sugar with brown sugar and reducing the total amount of sugar in the batter, so it's less sweet than it would otherwise be, but the chocolate icing and sprinkles on top, make up for that.


Simplest Chocolate Cake
Dry Ingredients:
1 1/2 cups plain flour
1/2 cup light brown sugar
1/4 cup cocoa powder
1/2 teaspoon salt
1 teaspoon bicarb soda

Wet Ingredients:
250mls warm water
1/3 cup vegetable oil 
1 Tablespoon white vinegar
1 teaspoon vanilla

1.  Preheat oven to 180C. Line 20cm square cake tin.
2. Whisk together dry ingredients in large bowl.
3.  Make well in centre of dry ingredients and pour in wet ingredients.
4.  Mix until combined and there are no lumps in the batter.
5.  Pour batter into cake tin.
6.  Bake for 15-20mins or until cake is slightly springy to touch and skewer, inserted into 
     centre of cake, comes out clean.
7.  Cool in tin for 10mins before turning out cake onto a cake rack to cool.
8.  Ice with chocolatey icing and sprinkles too once cake is completely cool.

I decorated this cake with a very simple chocolate icing made with pure icing sugar, cocoa powder and a little hot water. I sprinkled tiny, colourful 100s & 1000s, saved from the bottom of a packet of Freckles sweets, over the top for a bit of fun.

It's definitely possible to make a cake - a lovely chocolatey cake - without eggs, butter or milk. And, if you have sprinkles, it's even better!

Meg


Friday, 10 April 2020

First Hot Cross Buns

Hot cross buns, warm and fresh from my oven, were my Easter imaginings very early on this Good Friday morning. These imaginings ignored my somewhat hopeless record when making breads, rolls or buns that require yeast, kneading and proving. On the very few occasions I have attempted this bread-making caper, I have ended up with a variety of rocks shaped like loaves. Once, when I actually managed to get a dough to rise after placing it in a sunny spot at the top of my front steps, the whole thing managed to roll itself down to the bottom. That certainly knocked ALL the air out of it! But I promptly forgot all this in the midst of my imaginings this morning and this was the result...

A half dozen little hot cross buns.

While one has to ignore the less-than-uniform shape of these little Easter buns and imagine more defined crosses on their tops, made with a paste of flour and water, they are otherwise delicious. They are very light, not the least bit rocky and the little choc-chips inside, which are my substitute for the sultanas and mixed peel that we do not favour, are just sweet enough. With their shiny glaze of a little local honey on top, they are a step in the right direction along my bread-baking road and I couldn't be happier about that given my previous attempts.


 Mixing the dough in my favourite big bowl.

A little ball of dough after kneading on my kitchen bench.

Ready to place in warm spot to rise. 

Light & fluffy dough after hours in the oven.

There could very well have been a different outcome of hot cross rocks. Today is not ideal for baking bread. It's actually overcast, showery and cold so there was no warm sunshine in which to sit my dough to rise. (Tomorrow, it's meant to be 31C, but I could not wait.I ditched the first sachet of yeast, declaring it dead, and used one that smelt like beer when I opened the packet. It seemed like a good omen. I followed Jamie Oliver's recipe, for if I was going to bake buns then I decided I'd rely on an expert. All was kneading together nicely until the time came to cover my little ball of spiced dough, all round and smooth and sitting in my favourite bowl (that seemed like a good omen too) and find somewhere warm for it to rise. I covered it and carefully carried it downstairs and under the house to sit it on top of our hot water system and then realised there was no heat coming off that towering tank of water. So, in desperation, I put it in my oven. Thankfully, I only preheated it to 30C because I subsequently read, while fretting that it wouldn't rise, that yeast begins to die at around 45C. I let my dough sit in the warmth of the oven, switched off and door closed, for a lot longer than the hour recommended. I left it for more like three hours and, despite my 'best' efforts, it rose!  


Dark chocolate chips instead of dried fruits.

After such a long wait, I very happily  kneaded in those chocolate chips, made six little buns and left them to rise once more which, to my amazement, they did! While they were baking, their scrumptious scent wafted through the house. They emerged from the oven golden on top and all soft on the inside. Enjoyably edible and not in the least bit like rocks. Yes!

One sweet little hot cross bun.

Tomorrow, I am going to bake these hot cross buns again for they are now all gone. I'll see if I can shape them a little more uniformly and perhaps I'll pipe those crosses on instead of painting them on with the edge of a spoon. And, with a 31C day forecast, I should have plenty of warm spots for the dough to rise in though I won't be resting it at the top of my front stairs!

Have you been baking for Easter?

Meg


Friday, 27 March 2020

Simple Carrot Cake

I think I baked this cake just so I could have cream cheese icing! I wasn't thinking about the orange carrot-y goodness or sweet local honey or the crunchy crushed walnuts. What I was thinking about was that creamy, tangy icing that makes any carrot cake complete (in my opinion).


Carrot cake with cream cheese icing.


My carrot cake craving began when I was leafing through an old copy of Backyard Farmer magazine, issue No. 12 to be precise. There was a recipe, submitted by Lisa Walker, for an 'As Simple As It Comes, But Oh So Delicious' Carrot Cake recipe from a cafe called Bruce's at Wynyard in Tasmania. I adjusted the recipe a bit, as I wanted to use spelt flours, so here's how I made it in my kitchen:

Simple Carrot Cake🥕

Ingredients:

1/3  cup brown sugar
1/2  cup wholemeal spelt flour
3/4 cup white spelt flour
2 teaspoons baking powder
1/2 teaspoon bicarb soda
2 teaspoons cinnamon
2 large carrots, peeled & grated (*I coarsely grated the carrot but think finely grating it would be best.)
1/3 cup chopped toasted walnuts

1/2  cup vegetable oil (*I used macadamia nut oil.)
3 large eggs
1/3 cup local honey

Method:

1.  Preheat oven to 170C.  Grease and line a cake tin.

2.  Whisk flours, baking powder, bicarb soda, cinnamon and sugar in large bowl.

3.  Blend oil, eggs and honey until creamy and frothy.

4.  Make well in centre of the dry ingredients. Pour in blended wet ingredients.

5.  Mix gently and, just before all the flour is incorporated, add in the grated carrot and 
     walnuts and finish combining cake batter. Do not overmix!

6.  Fill prepared cake tin with the cake batter. 

7.  Bake, on middle rack in the oven, for around 45mins. Cake should bounce back when lightly touched.


I didn't follow a recipe, like this one, for cream cheese icing. I simply beat together  1/2 tub of softened cream cheese,  a tablespoon or so of lemon juice and then added some spoonfuls of icing sugar until it tasted just right.


Wholesome ingredients.

This cake was oh so simple to make and it did taste oh so delicious....especially with that creamy, tangy cream cheese icing on top.


I've been thinking that I may just bake another carrot cake soon.  (After all, I do have half a tub of cream cheese left over so could make more icing.😉) Perhaps, I will try this recipe for the carrot cake that was judged to be Australia's Best. Apparently, the judges had a debate about whether carrot cake is really carrot cake without cream cheese icing! 

What do you think? Is carrot cake really carrot cake without cream cheese icing?

Meg

Saturday, 30 March 2019

Chocolate & Oat Cookies

On a Sunday, I bake lunchbox snacks for the school and working week ahead. This saves us money and time as we are not buying prepackaged snacks and popping a slice of homemade cake or chunky cookies into a lunchbox is very quick and easy of a weekday morning when everyone is trying to get to where they need to be on time.

 Chocolate cookies with chocolate chips!

Recently, I came across a recipe for a scrumptious version of chocolate cookies. They are flourless and include almond meal. (My son can now take foods with nuts in them to high school whereas his primary school had a no nuts policy.) The nuts in them make them unsuitable for those with an allergy to nuts.

The original recipe, which I have tinkered with very minimally, comes from Amanda at Running with Spoons.  I simply reduced the sugar content a little more and used dark chocolate chips rather than mint chocolate chips. There are very simple cookies to make:


Chocolate & Oat Cookies
*Unsuitable for those with a nut allergy.*

1 cup organic quick oats
1/2 cup almond meal
1/4 cup unsweetened cocoa powder
4 Tablespoons brown sugar or coconut sugar
1/2 teaspoon baking soda
1/2 teaspoon baking powder
1 large or 2 small eggs
3 Tablespoons coconut oil (melted if it is not in liquid state)
1/4 cup of tiny, dark chocolate chips

1.  Preheat oven to 170C. Line a large baking tray.

2.  Mix all the dry ingredients, except the chocolate chips, together in a large bowl. 

3.  Add the coconut oil and beaten egg to the dry ingredients. Mix well.

4.  Mix in the chocolate chips.

5.  Roll tablespoons of mixture into balls, placing onto baking tray so there is room for them 
     to spread. Flatten top of each one slightly with your fingers.

6.  Bake for approximately 10mins (but keep an eye on them as they may cook faster in 
     your oven.)

7.  Allow to cool for 10mins on tray before transferring to a wire cooling rack.

8. Store in an airtight container (I put them in the fridge) for up to a week.

A chocolatey bowl!


These cookies are very chocolatey but not overly sweet. A more wholesome take on a chocolate cookie that is simple and delicious.

Do you have a favourite recipe for chocolate cookies?

Meg


Tuesday, 4 December 2018

Chocolate-y Choc-Chip Cupcakes

Small chocolate-y choc chip cupcakes, made light and moist by a mixture including both sour cream and yoghurt, are a lovely semi-sweet treat.

Delicious treat!

I took this recipe, for Sour Cream Double Chocolate Muffins, and tweaked it just a little so I could use up a little bit of sour cream and a little bit of plain yoghurt I had in the fridge. As usual, I made them with spelt flour but you could always use plain flour. Here's how I made them:

Chocolate-y Choc-Chip Cupcakes
(Makes 12 small cupcakes)

Dry Ingredients:                                                                           Wet Mix:
3/4 cup white spelt flour                                                              1/2 cup sour cream                
1/4 cup cocoa powder                                                                   1/4 cup plain yoghurt
1/4 cup brown sugar or coconut sugar                                      1 small egg
1/2 teaspoon baking powder                                                       30g melted butter
1/2 teaspoon bicarb soda                                                             1/4 cup milk
1/2 cup mini semi-sweet chocolate chips

1.  Preheat oven to 180C and prepare pan by lining with cupcake cases.

2.  Combine dry ingredients in a mixing bowl and whisk until well combined with no lumps.

3.  Blend wet mix ingredients together in a large measuring jug or bowl.

4.  Make a well in centre of dry ingredients and pour wet mixture in. 

5.  Mix together until just combined.

6.  Half fill each of your cupcake cases with batter.

7.  Bake 15-20mins until cupcakes have risen and are springy to touch.

8.  Cool in pan for a few minutes before finishing cooling on a wire rack.

Silicone cupcake cases.

You can use paper or silicone cupcake cases to line your pan. I tend to use my set of individual silicone cases when I know the cupcakes I'm making are going to be quite moist or I want a little fluted cupcake shape. 

While not overly sweet, these little cupcakes are very chocolate-y indeed! Pop one into a lunchbox or on your afternoon tea plate for a little burst of chocolate-y choc-chip goodness in your day!

Meg


Thursday, 27 September 2018

Sweet Strawberry Cloth

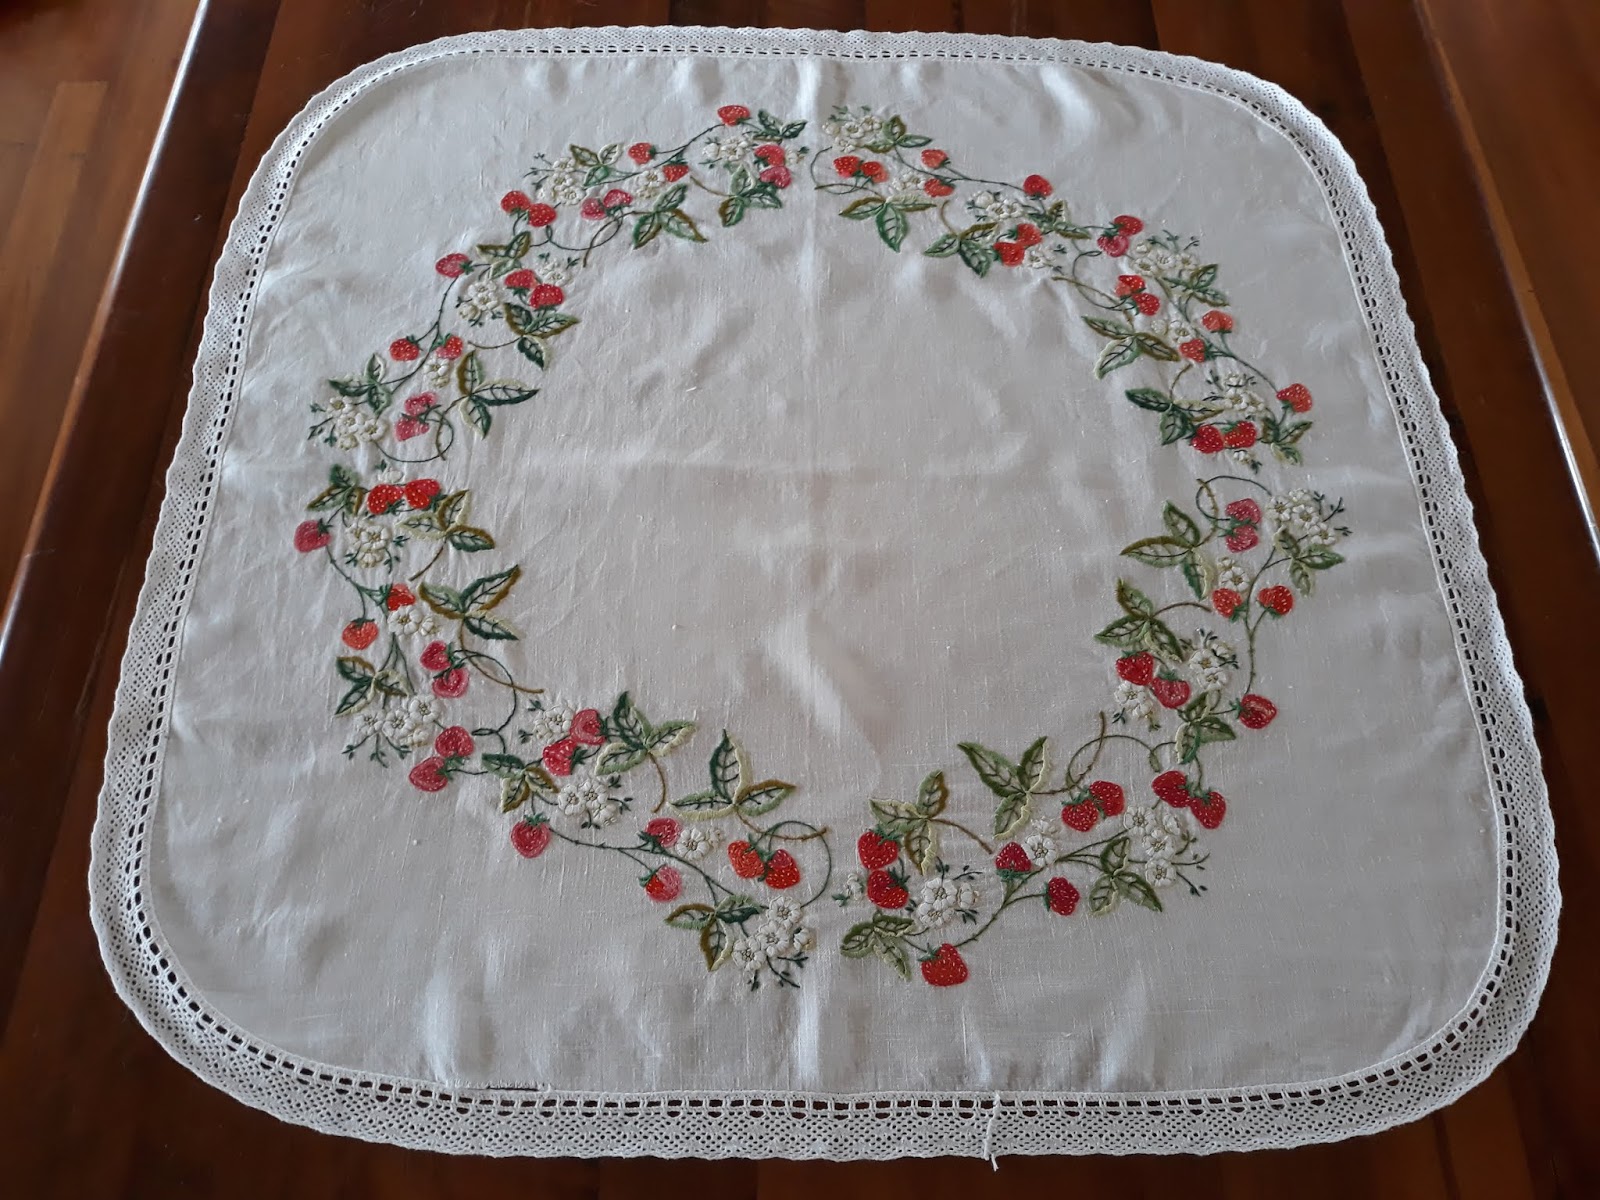
Folded gently and hanging over a polished wooden rack, in the far back corner of my favourite little antiques and other old-things shop, I found this most lovely afternoon tea cloth.  I imagine many a cream tea with fresh scones, fruity jam and dollop-y cream would have been laid out upon this beautiful cloth. 


Strawberries for afternoon tea!

Old, soft linen embroidered with dozens of twining strawberries. So many ruby red and pink fruits created with such tiny stitches. With its circle of berries, leaves and blossoms, it reminds me of botanical art that pays such close attention to the intricate detail of plants. 


So many tiny stitches.

I am looking forward to spreading out my strawberry cloth, over a table in the shade of our verandah, and having my very own little cream tea. I'll make sure to have strawberry jam for my scones as somehow I don't think apricot jam would be quite right. 🍓

Meg


Monday, 25 June 2018

A Simple Sponge Cake

We had a bit of a celebration here over the weekend and I made this simple sponge cake, filled with jam and iced with unsweetened, fresh cream and a circle of tiny chocolate buttons. Simple and soooo good!

A slice of a simple &  scrumptious sponge cake.

Iced with fresh cream, tiny chocolate buttons & a flurry of chocolate flakes.

The recipe for the sponge cake is just a doubling of the base cake for this cheesecake spongeYou need eggs, sugar, plain and self raising flours, cornflour and lots of whipped air! 

Here's the adjusted recipe for the sponge:

Grease and line a medium-sized round cake tin. Preheat your oven to 180C. Beat 4 eggs until thick and creamy. Gradually add 2/3cup caster sugar while beating until sugar dissolved. Gently fold in 4 Tablespoons each of sifted plain flour, self raising flour and cornflour. Spoon mixture into prepared cake tin and spread evenly over base. Bake for approximately 20mins. Remove from oven when lightly golden. Rest cake for a few minutes before turning out cake and cooling on a wire rack.

Beat eggs 'til very frothy.

 Beat in sugar until pale and creamy.

Sift three flours into whisked eggs & sugar. 

Fold flours gently into  

 Pour mixture into prepared cake tin.

Bake until lightly golden.

Once the sponge cake has cooled, you can make it into something special in lots of different ways. I chose that classic combination of strawberry jam, cream and a little chocolate for my cake:

 Cut cake carefully in half and spread with jam.

Spread reassembled cake with very thickly whipped cream. 

Grate dark chocolate over the cream & add a ring of tiny chocolate buttons.

Sponge cakes, all light and airy, are just perfect for special celebrations. Instead of icing with thick cream, you can dust them with icing sugar as Cheryl, over at A Simply Good Life, did for her birthday high tea. Or perhaps, instead of strawberry jam, you'd rather fill them with slices of fresh strawberries to make a strawberry sponge cake like the one Rhonda, over at Down to Earth, enjoyed for her special birthday this year. Next time I make a sponge (...I'm just waiting for any excuse...), I think I will fill it with cream and drizzle tangy passionfruit icing over it to make this delicious looking Passionfruit Sponge I found over at SBS Food. How utterly indulgent!

The next "excuse" for sponge cake here will coincide with an almost-80th birthday to be celebrated in July. Best save some passionfruit pulp in the freezer for that occasion!

Meg


Monday, 23 April 2018

Honey & Ginger Anzac biscuits

Sweet and oat-y and thought to be a welcome inclusion in care packages sent to loved ones fighting in a long-ago war so far from home, Anzac biscuits are an Australian tradition that take their name from those first brave ANZAC soldiers who landed on a far away beach at Gallipoli in Turkey, on April 25th, 1915. On that April date each year, our nation solemnly remembers those long-ago soldiers and all those who have come after them. 

Those original Anzac biscuits had a long way to travel to reach loved ones on faraway shores. While traditionally made with rolled oats and golden syrup, without eggs and with lots of sugar, there are many twists now on the original recipe that began appearing in recipe books from the 1920s.  Traditional or with a twist? Chewy or crunchy? However you like them best, they are a biscuit with ties to our nation's history.

ANZAC biscuits with a ginger twist!

I discovered this version, for Nourishing Anzac Biscuits, over at Georgia Harding's blog,  Well Nourished, while looking for a healthier version that had far less refined sugar. In my much-loved, old and splattered copy of the Day-to-Day Cookery Book by I.M. Downes, the Anzac Biscuit recipe calls for a whopping 3/4cup of sugar. While Georgia's recipe incorporates ground, mixed seeds, I have tweaked the recipe to make these biscuits without them. Here's how I made them:

Honey & Ginger Anzac Biscuits

100g butter
60g raw honey
1 teaspoon bicarb soda

1/2cup wholemeal spelt flour
1 cup rolled oats
1/2cup dessicated coconut
1/4cup of coconut or brown sugar (optional)
1 teaspoon cinnamon
1 teaspoon ginger powder

1.  Preheat oven to 170C.

2.  In large bowl, combine all dry ingredients, except bicarb soda. 

3.  Melt butter with honey in a small saucepan over a medium heat. Remove from heat as 
     soon as butter has melted.

4.  Add bicarb soda and stir in very gently as mixture becomes frothy.

5.  Pour frothy butter mixture into dry ingredients and mix well. 

6.  Roll tablespoons of mixture into balls with wet hands (as mixture is somewhat sticky)
      and place on lined baking trays. *Leave room between each biscuit to spread as it bakes.*
      Flatten each biscuit ball slightly with a fork.

7.  Bake until golden. Remove from oven and allow to cool considerably on trays before 
     transferring to a wire rack to finish cooling.

8.  Store in an air-tight container. 

Try not to munch on too many of these before Anzac Day on April 25th otherwise you'll find yourself up early baking an extra batch!

Meg