Showing posts with label container gardening. Show all posts

Monday, 10 April 2017

A Peek into Permaculture: Producing Food at Home

There is something quite wonderful about a garden that grows food. For me, it is a joy that is made tangible in the:

*   "tucking in" of seeds full of potential;
*   tiny seedlings that emerge in nourishing soils;
*   edible greens, fattening pods, ripening fruits and expanding tubers;
*   baskets laden with food harvested not far from our very own back door; 
*   making of meals using some of our very own produce ...
&  it's in the sharing of excess with family, friends, neighbours and strangers.

Ripening mandarins on our tree beginning to blush orange.

But growing food in our own garden is so much more than that. It is about:

*   locally grown goodness (as local as it gets);
*   healthy food produced without chemicals;
*   fresh food tasted and cooked and appreciated just minutes after it's been harvested;
*   precious seeds saved and shared ...
&  it's about a measure of self-reliance.

Fresh, young silverbeet growing happily among the flowers.

I have not read much of the work of Bill Mollison, co-originator of Permaculture along with David Holmgren, but these wise words of his were echoing in my mind as I planted the first of this Autumn's seedlings:

"The greatest change we need to make is from consumption to production,
even if on a small scale in our own gardens ..."

Just planted ... Perpetual Spinach, Tuscan Kale and Silverbeet seedlings in my garden.

The planting out of seedlings, a seemingly simple act of gardening, is so much more than that.  Perhaps, that is why growing some of our own food fills me with such happiness.

Do you grow some of your own food at home too? 

Meg


Monday, 3 April 2017

A Peek Into Permaculture: Soil

Our bare block of land, that we bought and built on fourteen years ago, was covered by a layer of shale on top of clay. All the garden "soil" (and I'm using that term very loosely here) had to be carted in. Over the ensuing years, I came to realise that this "soil" wasn't a living soil, it lacked depth and structure and nutrients. It was the source of my great frustration that very little grew well here because, as was reinforced at the Introduction to Permaculture course I attended recently, rich soil is the basis for healthy plants and abundant yields.

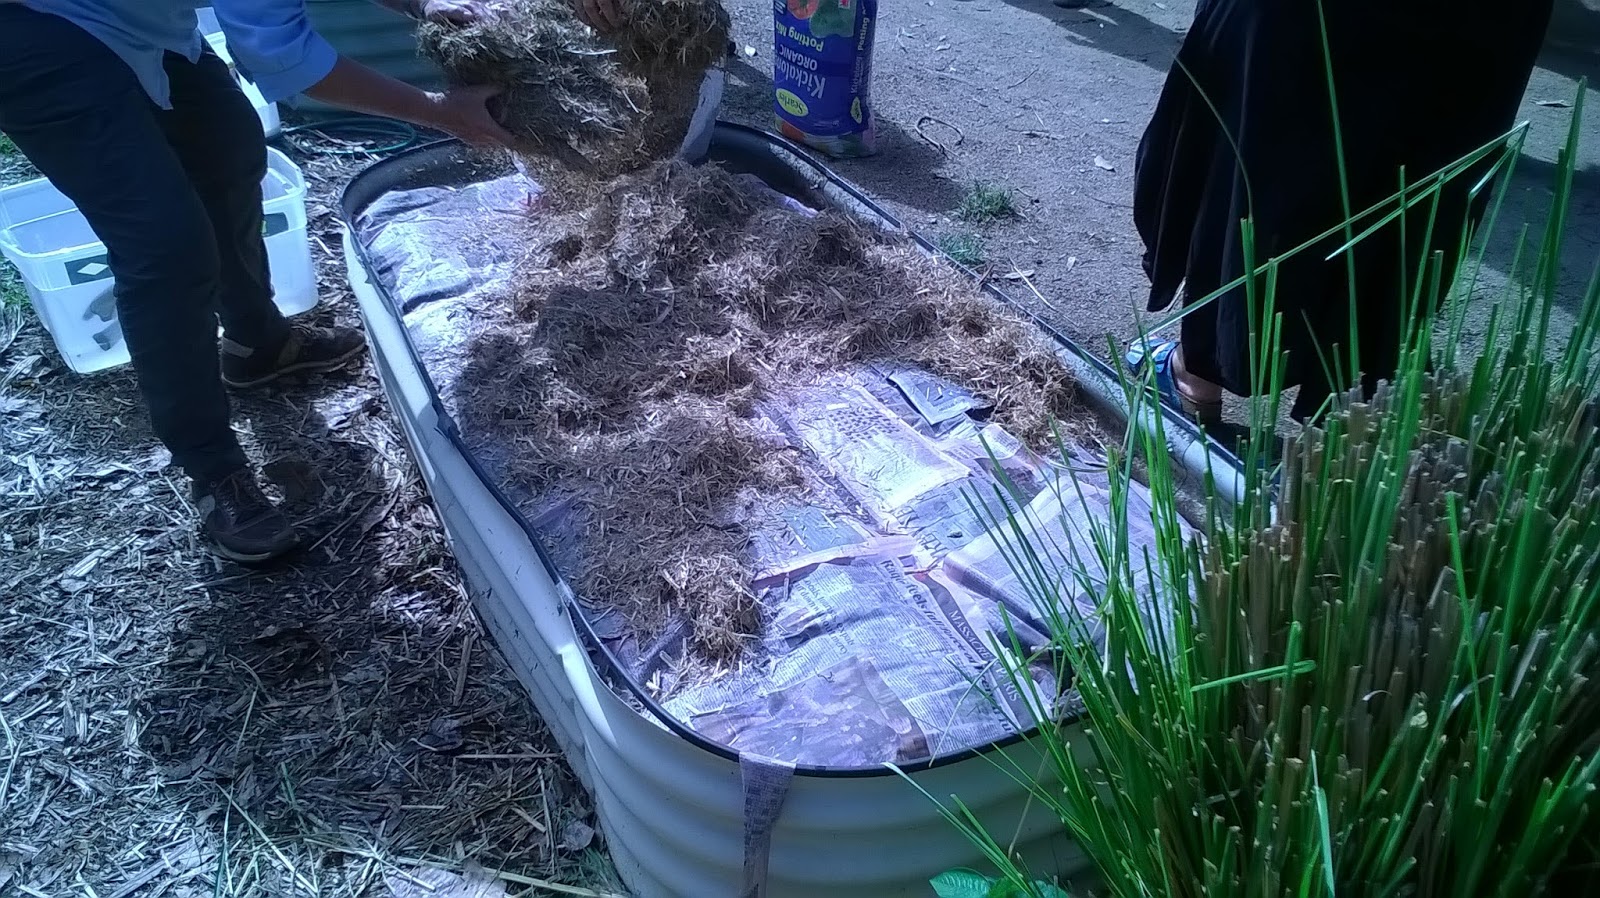
So how do you begin to build up and rejuvenate even the most lacking of soils? One way is to create a no-dig garden bed on top of existing soil. Our course teacher, Morag Gamble, involved us in rejuvenating two big container gardens in at the city farm but her method is just as applicable to non-enclosed garden beds. Here's how we did it:

 Choose a site or old garden bed to rejuvenate.

 Loosen and lift soil without turning soil over.

 Add thin layer of fresh beneficial green leaves.
(e.g. comfrey, pigeon pea, leopard tree, canna lily)

 Add a thick layer of compost.

Water in compost with diluted worm tea.

Soak old newspapers in water and lay over compost.

Completely cover compost with newspaper.

 Spread a layer of mulch over the newspaper.

Plant your seedlings well into the compost layer.
Water them in.

After rain is a great time to make a no-dig bed as the existing ground is watered and moist. So, after the torrential rain of Thursday just past, I spent the weekend rejuvenating my garden beds. I can't wait to plant out some seedlings of Autumn veg like kale and silverbeet and beetroot. They should really "take off" in the replenished and nourishing soil of my no-dig beds.

How do you build up/rejuvenate your soil? 

Meg

p.s. In the third photo, you can see a layer of newspaper underneath the beneficial green leaves. You only need to do this if you have concerns regarding soil contamination. If you do have such concerns, you should consider getting your existing soil tested.


Wednesday, 3 August 2016

Planting Memories: Native Raspberries

Have you ever become lost in time as you breathe in the indescribable scent of sweet peas? Have you ever felt as if a child again at the first taste of the freshest sweet corn on the cob? Have you ever remembered a loved one at the unfurling of a treasured rose? Or perhaps you remember hands and lips stained purple from gorging on ripe and irresistible mulberries?  Plants have that magical power to evoke nostalgia and, as a gardener, afford us the opportunity to grow some of those memories in our own gardens.

When I was a young girl, a dear Aunt and Uncle owned a dairy farm in a very wet and very green region in northern Australia. (They still own that farm but they grow tea now as milking cows became unprofitable after dairy industry deregulation.) I visited their farm often, when my mother would collect fresh milk for our family and when we would go to play with our cousins. On one such visit, I remember clambering onto the back of an old ute with my cousins and driving through the paddocks and out to a shady, musty-smelling forest.  On the edges of that forest, we found ruby-red gems growing on prickly stems. We picked them and gobbled them up with great joy (despite the scratches). Those gems were native raspberries (Atherton Raspberries) and I've never forgotten them.

One of the two native raspberries I've planted in my garden.

So, when I saw native raspberry plants at my favourite nursery last weekend, I could not resist bringing two home. They are not Atherton Raspberries, which come from a region some 2000kilometres from here, but a raspberry for the area where I now live. While each plant was just labelled with the very general Native Raspberry tag, I have a feeling I might have Rubus Parvifolius as described at this link about Australia's eight different types of native raspberries.

I have planted my two precious native raspberries in the dappled shade underneath my passionfruit vine. There they will receive filtered sunlight, plenty of water and have room to ramble over the ground. I do hope they will fruit so that I can pick them and gobble them up as I did when a child many years ago.

Do you grow any plants for the memories they evoke in your garden?

Meg

p.s. The Happy Earth blog has this very informative page about Atherton Raspberries if you'd like to find out more about them and see their delicious fruits. 

Wednesday, 13 January 2016

The Compost Balancing Act

It took me such a long time to make compost successfully! I'd have compost that didn't break down properly or I'd have a stinky, too-wet pile that I couldn't spread anywhere. Then, after lots of researching (any excuse to watch gardening shows and DVDs) and talking to other gardeners, I was finally able to create crumbly, sweet-smelling compost that nourishes my soil. The secret was balance!

Achieving balance in a compost heap or bin means that things have to be added to it in the right proportions. Too much green, fresh material (such as veggie peelings or fresh lawn clippings) means a smelly, overly-moist mess. Too much dry, brown matter (such as leaf litter or shredded newspaper) means it takes forever to break down and you have no compost when you need it. I was often adding way too much fresh, green plant material. Soggy!

Fresh green garden trimmings ready to add to our compost bins.

I have found, within our rotating bin system, that I can achieve balance by looking inside the bins more regularly, smelling the piles inside and adding more fresh green or dry brown material depending on the level of moisture and the "fragrance" of the heap. Typically, I will often find myself adding more dry brown plant matter like the wonderful crispy fallen leaves from our neighbour's amazing plane trees. These deciduous trees drop their crunchy, crackly dry leaves every Winter and we rake them up to add to our compost bins as we need them. 

Dry, brown leaves destined for our compost bins.

The other key part of creating lovely compost is aeration. For us, this means spinning our barrels very regularly. Regular rotation stops the plant matter mixture inside the barrels from compacting and keeps the microbes, who do all the work in breaking down the composting materials, lively and happy. And, when those microbes are happy, in a compost pile with not too much green and not too much brown plant material, they will reward you with beautiful compost that you can nourish your garden with.

Compost from one of our rotating bins. 

Composting is the ultimate in recycling. All the plant matter that we direct into our compost bins would otherwise go to landfill where its goodness would be wasted. Instead, once broken down in our composting bins, it feeds the soil in which we grow the plants that feed us. 

Do you make compost at your place? What sort of system do you have?

Meg


Monday, 11 January 2016

Wonderful Wicking Wine Barrels

For years, I struggled to grow anything in one particularly tricky spot in our garden. This area, along a section of our back fence line, has very shallow soil and is bordered by a hedge of native lilly pillies on our neighbour's side. The roots of these trees had spread far and wide and were competing for any water and nutrients my plants were seeking. And the lilly pillies were winning!

After so many frustrating failures, trying to get anything established in the ground, I had an epiphany of sorts (goodness knows why it took me so long)! I needed to find a way to bypass those lilly pilly roots and provide my plants with deep, nutrient-rich soil and adequate water. The answer was in another area of my garden!

Around in the front garden, sited in a hot south-westerly position, were three big half wine-barrels that Lucas, the amazing gardener who taught me so much as he helped me improve our veggie patch, had set up. They had been modified to become self-watering, using the wicking technique, and the previous Summer had been planted with tomatoes, sweet potato and herbs. While they worked really well, they were in such a hot area of the garden and far from my kitchen so I didn't visit them often enough. I guess, in Permaculture terms, they were in the wrong zone! (Farmer Liz, of the blog Eight Acres, has a great explanation of these zones here.) So, I decided to move them. 

After much discussion, and with the promise of a delicious roast dinner at the end of the day, my husband moved all three of these very heavy wooden barrels and repositioned them in that tricky spot under those lilly pillies. With the addition of refreshed soil, and a full reservoir of water, I planted them out with lettuce, flowers and herbs which are growing happily there now. At last, success!

Lettuce, herbs and flowers in two of our wonderful wicking barrels.

Now, instead of struggling plants, desperately in need of water and nutrients, I have happy, healthy plants. All it took was to look at that tricky area in our garden with fresh eyes and to think outside the square a little bit to find a way to get the plants what they need in order to thrive.

Have you got any problem areas in your garden? What solutions have you tried? 

Meg

p.s. This link, to John Ditchburn's Urban Food Garden, has a brief and clear explanation of how a wicking bed works.