Friday, 29 April 2016

Cottage Gardening by the Book

I have several gardening books from which I take barrow loads of inspiration and snippets of advice. The one book I favour though is smaller than all the others, has no glossy photographs and was not written by a celebrity gardener but the information within its pages is specific to the cottage style of gardening I love and to the area in which I am growing my garden. 

 My favourite gardening book.

In a Brisbane Cottage Garden by Denise Horchner is a little book with big lists. Lists of hundreds of plants that Denise and her husband Henk (whom she affectionately nicknames "The Treasure") have grown successfully in their own cottage garden in a suburb not very far from where I live. There's lists for specific colours, different aspects, tricky spots, seasonal flowering, and my personal favourite, Plants for the Rotten Gardener! So, when I'm working on an area in our garden, and thinking about what might possibly grow well in that space, I open this little book to see what the Horchner's might recommend. Their localised advice offers me a much greater chance of success than would a gardening book written for the gardens of the Northern Hemisphere or even the southern states of Australia.

 Lavender grows in my cottage garden.

My own Brisbane cottage garden certainly doesn't look like impressive English cottage gardens and it probably looks nothing like the Horchner's garden either. Still, there are many plants growing in my garden now that give it a cottagey feel and that I found out about in the pages of this little local book. 

Salvias are another cottage garden favourite.

I'll be out in my cottagey garden this coming weekend. There is light pruning to do, mulch to lay down, weeds to keep in check, lettuce leaves to harvest and flowers to pick too. All of which will leave me happy and content:)

I hope you get to spend some time enjoying a garden over the coming weekend. 

Meg


Tuesday, 26 April 2016

Pumpkin Spelt Scones

Warm scones, fresh from one's own oven, are perfect for afternoon tea on a cool Autumn afternoon. Some scone lovers like theirs plain, some prefer the sweet surprise of sultanas or dates within but I love pumpkin scones above all others. 

Freshly baked pumpkin spelt scones.

This is how I make pumpkin scones at my place. If you have some leftover pumpkin, mash it up and you can make them too!

Pumpkin Spelt Scones

1 3/4  cups spelt flour
2 teaspoons baking powder
pinch sea salt
100g butter, softened
1/2 cup cooled, mashed pumpkin
1/3 cup milk

Preheat your oven to 220C then:

Sift flour and baking powder into bowl. Add pinch of sea salt. 
Cut up softened butter into cubes and add to the bowl.

Using your fingertips, rub butter into the flour until mixture resembles fine breadcrumbs.

Whisk together mashed pumpkin and milk. Pour into a well in centre of the flour mixture.

Use a table knife to gently cut and mix until a soft dough forms.

Place dough on a floured surface and knead very lightly to form a ball.

Roll or press out dough (not too thin) and cut out rounds with a cutter.
*Dip edge of cutter in little extra flour to prevent dough sticking to it.*

Place unbaked scones n a lined cake tin so they are almost touching.

Bake in hot oven until golden and your home is filled with smell of fresh scones!

The only thing left to do, once these scones are baked, is to wait impatiently until they have cooled just enough to eat. I wrap them gently in a loosely tied linen teatowel while I wait. Then, I slice them in two and top them with tart berry jam and freshly whipped cream. Delicious!

Meg

Monday, 25 April 2016

A Fragrant and Hardy Hedge

If you were to walk through our little front gate, early in the morning or later in the afternoon, you would be greeted at the moment by the fragrant flowers in our hedge of Michelia Coco. 

 The fragrant, creamy bloom of  Michelia Coco.

These beautiful, evergreen shrubs belong to the same family of plants as Magnolias. While their creamy blooms are much smaller than the often impressive blooms of their cousins, their heady fragrance leaves one snatching at memories when trying to describe their distinctive, fruity scent. To me, it is sweetly reminiscent of Juicy Fruit chewing gum! Others have said it smells like ripe bananas!

Michelia Coco frame our little front gate.

I've found these shrubs to be particularly hardy in our garden. They are planted, two either side, of our front gate in a full sun position that faces South West. It gets very hot there in the Summer but I rarely water them. They remain covered in leafy, emerald-green foliage that looks wonderful in the bunches of flowers I pick to bring inside. The blooms, which emerge from buds covered in a lightly-browned, soft fuzz, are creamy with little blushes of purple in their centres. Small, but very beautiful!

Native bees on a beautiful blossom.

Our resident native bees love these blooms too. In the morning, when that heady fragrance is released into the air, dozens and dozens of little native bees gather in the blossoms. There they work happily among the flowers that these shrubs are covered in right now. 

I am happily working out in the garden now the heat of the Summer has faded. I make sure too that I pause, and breathe in deeply, whenever I am near our blooming hedge of Michelia Coco. 

Meg


Friday, 22 April 2016

A Garden Visitor 4

Among the branches of our mandarin tree, this impressive butterfly flitted and fluttered before pausing, only briefly, to lay eggs under the leaves. She is an Orchard Swallowtail and she is rather beautiful.

An Orchard Swallowtail lays an egg under a mandarin leaf.

These swallowtails are the largest of all the butterflies that grace our garden. Their magnificent size and colourful wings hold one's attention as they hover, wings beating rapidly, around the citrus trees. 

Over the years, we have observed many times the life cycle of this stunning butterfly. The emergence of an Orchard Swallowtail from its chrysallis is a truly wondrous thing that can hold one spellbound. 

If you have time over the coming weekend, you might like to witness this incredible metamorphosis too through the stunning photos and video at this YouTube link. The images and accompanying music are beautiful.

Have a lovely weekend.
Meg


Wednesday, 20 April 2016

A Happy Jumble

Tucked into the soil, in my main veggie bed, are dozens of little seedlings. There is lettuce, silverbeet, Egyptian spinach, a non-hearting cabbage, beetroot, cornflowers, lobelia, dianthus, violas ("Johnny Jump-ups") and sweet peas. They are not planted in rows but intermingle in a happy jumble of veggies and flowers.

A pretty and delicious speckled lettuce.

 The vibrant blue blooms of lobelia.

 Very versatile silverbeet.

 Beautiful beetroot!

 Something new to try this year.

 Dianthus adds a pop of colour and the bees love  the honey-scented alyssum. 

Something different...non-hearting cabbage.

 Sweet peas like my grandparents used to grow. Oh, how I hope they will bloom for me!

All of these precious seedlings were planted over the last week or so. As I water them in the early mornings, I get such joy from imagining this garden bed in just a few short weeks time. In my mind's eye I can see tall silverbeet, colourful lettuce leaves, cheery Johnny Jump-ups, the nutritious leaves of the spinach and cabbage and the vibrant blues of the lobelia and cornflowers. And, while the wait will be longer, I am so looking forward to that first sweet pea bloom that I know will smell indescribably of my Grandmother. For, in planting them, I have planted memories!

What have you planted out in your garden recently? Have you planted some memories too?

Meg

Monday, 18 April 2016

My Favourite Minestrone

Now that the light fades sooner and the evening air has its Autumn chill, soup has made a welcome return to our dinner table. For me, there is nothing better on a colder night than a bowl of warm, homemade soup with fresh bread. Such a simple meal but so nourishing!


Minestrone Soup


Over the weekend, I made a big batch of my favourite minestrone filled with delicious vegetables. This soup is easy to make, economical and filling when served with fresh bread. The original recipe is long forgotten but I have made it so many times over the years that I no longer need a recipe to follow. This is how I made it today:

Minestrone Soup

3 cloves garlic
1 large onion
2 rashers bacon
large glug of olive oil
3 large carrots
2 sticks celery
2 large or 3 medium potatoes
large handful of green beans
1 large zucchini
1 litre vegetable stock
1/2 litre of filtered water
1 x 400g can chopped organic tomatoes
2 tablespoons tomato paste
large handful of fresh basil leaves


* You will need a large soup pot (or similar) with a lid to make this soup.*

1.  Peel and crush garlic cloves. Peel and finely chop onion. Dice bacon.
2. Peel and roughly chop remaining vegetables, keeping beans and zucchini separate from carrots, celery and potatoes.
3.  Heat large glug of olive oil in large pot over medium heat.
4.  Fry garlic, onion and bacon in oil until onion becomes translucent.
5.  Add chopped carrots, celery and potatoes and fry for a few minutes.
6.  Add chopped beans and zucchini and fry for few minutes.
7.  Turn down heat to low, put lid on pot and let vegetables cook for further 15mins, stirring very regularly so they don't stick to the bottom of the pot.
8.  Add stock, water, tomatoes and tomato paste and chopped basil leaves to pot. Stir until well combined.
9. Bring to boil again and then lower heat so soup comes to a simmer. Cook until all vegetables are tender.

You can serve this soup with warm, fresh bread and shavings of parmesan cheese. Alternatively, you could serve it with cooked pasta shells or macaroni stirred through the soup instead of the bread...or with the bread so that that little puddle of soup, left in the bottom of the bowl,  can be soaked up. Either way, it's delicious!

Meg


Friday, 15 April 2016

Stitching Greens

In a small and beckoning antique shop, I found a little basket of old embroidery threads. As I looked through the spectrum of colourful cottons, I was drawn to the greens; mossy and bright and muted greens. Onto a piece of soft and light linen, from an old and well-worn tea towel, I have been stitching leaves. Simple, scattered green leaves. 

Leaves on linen.

When I've finished scattering leaves all over the linen, I want to use it to make a project bag, like this one made by Melissa Wastney of the blog, Tiny HappyHer tiny and happy stitches have enchanted and inspired me for a long time. 

I usually store a knitting project in this beautiful handmade bag by Melissa Wastney.

So, when I found a pattern for a project bag in her book, Sweet and Simple Handmade, that I borrowed from the library recently, I felt it time I made one. Such a bag would be perfect for holding the knitted organic washcloths, like this one, that I am making for a friend whose baby will arrive later in the year.

A little project like this one is easy to pick up every now and again if one isn't in a hurry.  I store mine tucked into a basket on my crafting shelf and have embroidered a leaf or two whenever a moment for sitting quietly and stitching has presented itself.

I hope to have a few more such moments over the coming weekend to finish off the leaves. I hope you get some time too to finish off, or make progress on, your own project.

Have a lovely weekend.
Meg

p.s. I am using very simple backstitch to create my leaves. The tutorial at this link shows you how to use fishbone stitch to embroider a leaf.


Wednesday, 13 April 2016

Small Wonders

The tiny things offered up by nature are among the most delightful to me. There is something about their smallness that draws me to them; that makes me want to sit and examine closely their often intricate and delicate perfection. 

A tiny, pale beach flower.

A tiny forest fungi.

One tiny native bee visiting a blossom.

Are you drawn to small wonders too?

Meg


Monday, 11 April 2016

Autumn's Turn

I have been waiting for the subtle signs of Autumn. Waiting impatiently! And then, this morning, I noticed this leaf, among others, on the deciduous trees that border our fenceline. Its margin now defined by a rusty brown and its summery bright green changing to yellow, this leaf is a sure signal that Autumn has come. At last!

A beautiful Autumnal leaf.

I am so ready for Autumn for it is my favourite season of the year.  I love its clear blue skies, crisp mornings, cooler temperatures, changing leaves and warming foods. And, I love that it's time to fill my main veggie bed with the seedlings I've been hesitant to plant before now. For, while the calendar signalled Autumn's arrival a couple of weeks ago, daytime temperatures here (above 30degrees C) suggested Summer was lingering on.

Some seedlings for Autumn planting.

My main veggie bed has been ready for a few weeks. I enriched the soil with compost, worm castings and cow manure before covering it all with a blanket of newspaper and lucerne mulch. I've watered it regularly so it has retained its moisture. Under its top layer, it is rich and moist and waiting for seedlings to nourish. 

Waiting for seedlings!

Later today, in the fading light of an Autumnal afternoon, I will make little "pockets" in the mulch, break the newspaper layer, and carefully plant each seedling with a handful of compost for good measure. I'll water them in with seaweed solution and wait for them to grow. 

More seedlings for our garden.

That wait will be well worth it. There is nothing more fresh and tasty than homegrown veggies from your own backyard.  I am looking forward to our Autumn harvests very much indeed. It seems too that there will be some sweet and juicy fruit ready soon too. Just as those beautiful leaves are changing their colours, so too are the mandarins which are gradually ripening to what will be a vibrant orange.

Ripening mandarins on our tree.

Yes, I love Autumn. There is so much to look forward to! I hope you have much to look forward to from your Autumn days too.

Meg


Friday, 8 April 2016

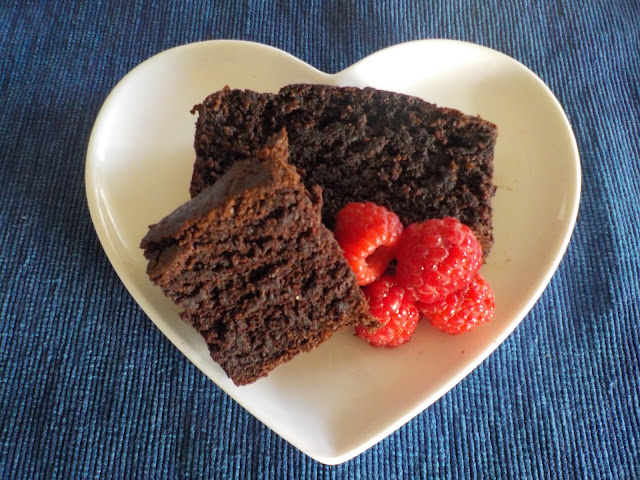
Chocolate and Sweet Potato Cake

I love sweet potatoes roasted, in salads or mashed as a topping on a shepherd's pie. My boy likes to eat them in chocolate cake. So, when we dug up a few sweet potatoes from the garden last week, it was cake we decided to make!

Love this cake!

The sweet potato in this chocolate cake adds sweetness and keeps the cake soft and moist. There's no need to ice this cake (though you could if you wanted to) but it is lovely served with freshly whipped cream, vanilla ice-cream or thick yoghurt. 

The recipe I use is based on Hazel Key's recipe for Clever Chocolate Cake in her book, The Clever Packed Lunch. 

This is how I make it at our place:

Chocolate and Sweet Potato Cake

180g mashed and cooled sweet potato
juice of two oranges
1 cup of medjool dates, pitted and chopped
100g melted butter
1 1/2 cups wholemeal spelt flour
1/2 cup dutch processed cocoa powder 
1 tablespoon baking powder
1/2 cup coconut sugar 
1 cup milk 

Peel, steam and mash sweet potato. Cool.

Melt butter. Add orange juice and dates.
Simmer until dates are soft. 

Whisk flour, baking powder, cocoa. 
Mix in the sugar.

 Blend sweet potato, date mixture and milk until smooth.

Pour blended mixture into dry ingredients.
Mix gently until just combined. 

Pour mixture into lined cake tin. 
Bake in a moderate oven for approximately 45minutes.
*Check if it's cooked by inserting a skewer and checking that it comes out clean.*
Cool on a wire rack.

I've found this cake is ideal for freezing. Once it has cooled completely, slice and place a single layer on a lined baking tray, cover with plastic wrap and freeze. When frozen, transfer slices to a labelled plastic clip-lock bag or air-tight container. Return to the freezer and defrost as needed for special guests or hungry children!

I hope you'll have time to bake yourself a cake this weekend!

Meg


Tuesday, 5 April 2016

The Makings of a Meal

I bustled away in the kitchen happily this morning. I measured and chopped and mixed and blended and whisked and generally had a lovely time. While I certainly created a huge pile of washing up, I had this deliciousness to share with my family at the end of my cooking flurry. Definitely worth the washing up!


Roast Pumpkin and Raw Broccoli Salad. Yum!
(I serve this with grilled chicken.)

The warm and creamy custard base for a homemade vanilla ice-cream. Mmm!

Chocolate and Sweet Potato Cake.  Scrumptious!

I'm sure you can guess which ones were for dessert!

Meg


Monday, 4 April 2016

Pretty Pink Pentas

When in flower, my pentas remind me of pretty pink pompoms with their rounded flowerheads made up of clusters of starry-shaped blooms. 

 Such a beautiful bloom!

At our place, they grow under the dappled shade offered by a large grevillia. This must offer them a favourable micro-climate because they thrive there in an otherwise hot, south-westerly facing part of the garden. 

Pink Pentas growing under our native red-flowering grevillia.

After they were first planted, they soon disappeared during a long drought but, with the return of more regular rain, new pentas plants sprang up and now they fill this space with their pretty blooms for much of the year. 

A little whimsy added by a young boy some years ago.

Pentas are very easy care perennials. In my experience, they benefit from a deep watering if they begin to wilt during drier times; a light pruning when their flowerheads are finished; and a more vigorous pruning when they become straggly. Apart from that, and the odd haphazard application of some worm tea and lucerne mulch, they are a very low-maintenance plant in my cottagy garden.

Meg


Friday, 1 April 2016

Sunlight and Solar

In our subtropical part of the world, we have an abundance of sunlight streaming down from the warm sun in the sky. 

Sunrise off our back deck this morning.

Over a year ago, we put a 3 kilowatt solar panel system on our roof to take advantage of nature's solar energy. This was in addition to our already existing solar hot water system. We took a long time to decide on the size of the system suitable for us and we are so glad that we didn't jump in and put the largest system we could afford on the roof. That would've been a 5 kilowatt system and many more panels than what we eventually decided upon. Without even seeing our bills or visiting our site, a couple of energy companies were recommending larger systems but one small installer took the time to go through our bills with us, looked at our roof and talked with us about the times of day when we use electricity the most. That installer recommended a 3 kilowatt system with capability, through our inverter, to add further panels later when battery storage becomes more affordable. I was a bit confused by this advice at first. Wouldn't it be better to just put a big system up there? In short. For Us. No. 

As I was driving to the market the other morning, listening to a talkback radio caller telling the radio host how he wished he hadn't put a 5 kilowatt system on his roof at a cost of around $8,000, I felt very grateful that we had listened to our installer. That poor talkback caller felt he would've been better off not having solar at all and putting his $8,000 in the bank instead! Because he and his wife both work during the day, they use the bulk of their electricity at night when there's no sunlight hitting their panels and so their system isn't producing anything. The tariff, at around 6 - 8 cents per kilowatt, down from around 40c per kilowatt initially, is what they get paid for the excess they generate from their system. They have to pay around 24c per killowatt for the electricity they use at night.  Their very expensive system saves them very little compared to their investment with the talkback caller estimating savings of between $60-$70 each quarter.

Our system, with high quality panels and inverter, cost us $4,800 and saved us $577 last year. That saving comes from less usage of electricity from the grid and from the 6c we get for each kilowatt we return to the grid. We think our investment will take between 7-8 years to pay for itself and the life of our panels extends well beyond that to approximately 20 years.


Our solar panels.

We are paying for the electricity that we use at night. We have 'tweaked' our patterns of usage by making little changes to try to reduce the amount of electricity we use after the sun goes down. So, the dishwasher is packed at night but isn't started until the sun hits our panels in the morning. The washing machine lays idle at night and is started up later in the morning. And I am constantly reminding our young boy to turn the light off after he leaves a room! These are small changes but each helps to reduce the amount of electricity our family uses at night. Those small changes add up to savings.

What we saved by not choosing a 5kilowatt system is sitting there waiting for when battery storage becomes a cost-effective reality for ordinary folk like us. And that time is getting closer.

Do you have solar on your roof? Are you happy with your choice of system? Why/why not?

Meg